The installation
program on the Alias DVD guides you through installation. You
can install from a local DVD drive or from a shared DVD drive accessed
via a network mapped drive.
- Insert the DVD into the drive of your
computer.
(If
you have copied the DVD onto your hard drive or a network location, you
can install Alias from there. Open the directory and double-click autorun.exe.)
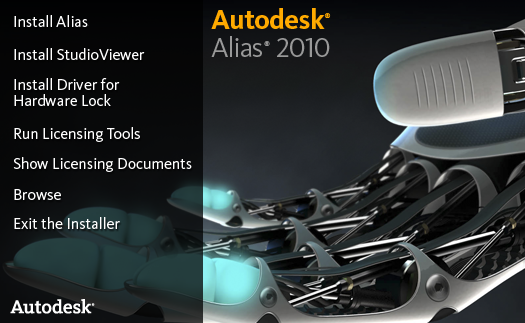
The Alias installation
window appears, giving you a choice of products and actions.
If the Installer page does not automatically
open, double-click autorun.exe on
your DVD drive to launch the application.
- Click Install Alias.
The Autodesk Product
Configuration Wizard opens, displaying the software License Agreement.
You must accept the agreement to continue with the installation.
- Read the entire License Agreement (you’ll
need to use the scroll bar), click I accept the terms
and conditions, and then click Next to continue
installing the software.
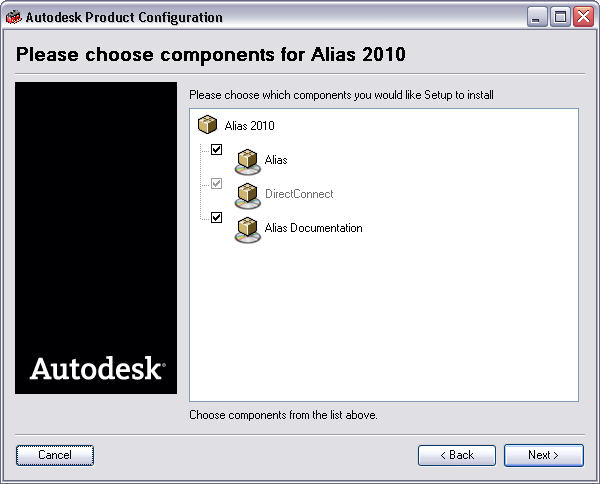
You
are prompted to choose the components to install.
- Choose all of them, unless you have already
installed the current version of DirectConnect with another product,
and then click Next.
The installation wizard appears. The wizard
directs you through the installation process. Click Next to
proceed through the installation, Back to return
to the previous window, or Cancel to
stop the installation.
- Click Next to continue
with the installation.
You
are prompted to choose the destination where the software will be installed.
The options in this window
are turned on by default.
- Add a Shortcut to the
Quick Launch Toolbar – Adds an Alias shortcut icon
to your Windows Quick Launch Toolbar.
- Add a Shortcut to the
Desktop – Adds the Alias shortcut icon to your desktop
during the installation.
- Choose a location:
- To install Alias to the default location (C:\Program Files\Autodesk\Alias2010\),
click Next.
-
To install Alias to another location, click Change.
The Change Current Destination
Folder window appears.
Navigate to the drive and folder where you want
to install the software and click OK.
The Setup Type window appears.
- Choose the type of installation setup
you want and then click Next:
- Complete – Installs Alias.
- Custom –
Lets you choose which components to install. If you are installing
the license server tools software for a floating license server,
choose the Custom > Licensing utilities option
so you can select the licensing software options.
- (Custom installation
only) If you clicked Custom, the Select Components window appears.
Click the + sign to the left of Alias to
see the components. Some components also have + signs, indicating
there are further choices that can be made. Each component has a
pull-down menu on the icon associated with it that enables you to
choose:
- This feature will be installed on local
hard drive
- This feature, and all subfeatures, will
be installed on local hard drive
- This feature will be installed when required
- This feature will not be available.
To install...
- The basic Alias software, click Base.
- Alias renderers, click Renderers.
- Utilities to license Alias software
and setup floating license servers, click License utilities.
- Open Digital Studio, click ODS.
NoteTo
install only renderers,
click only Renderers and License
utilities.
NoteSoftware drivers for hardware locks (dongles)
are not installed by default for node-locked dongle machines or
license server dongle machines. The initial Alias installation
window provides an option to install drivers for hardware locks.
See
Installing a hardware lock driver.
- (Custom installation
only) After you have chosen Alias components, click Next.
- (Complete and Custom installation)
Click Next in Add Program Folder
to System Path window.
Selecting
the Add to System Path check box in
this dialog ensures that the Alias 2010 Program Folder
is added to the System Path, enabling Alias 2010 commands
to be invoked from the command prompt.
The Ready to Install the Program window appears.
- Click Install to
begin the installation process.
The Installing Alias 2010 window appears.
This window displays the progress of the installation.
Do not click Cancel.
Due to the size of the software, the installation may take a few
minutes.
- When the installation is finished, the
InstallShield Wizard Completed window appears.
Click Finish.
You’ll then be prompted
to install the components selected in step #4.
- Click Next. Then
click Install from the Ready to Install
the Program window, to install the components.
When the InstallShield Wizard Completed window
appears, click Finish
- If all components (the application, DirectConnect,
and documentation) have been installed, click Next to
complete the installation.
It is not usually necessary to restart your
computer after installing Alias. If it is, the installation
window will tell you so. Installing a new version of DirectConnect
may require you to restart.
Congratulations! You have now installed Alias.
But before you can run it, you must install a license. See Licensing Alias.
NoteIf
you installed a service pack or hotfix to your licensed copy of Alias,
you do not need to re-license it.
If you or someone else using the software will
be learning the application using the tutorials provided with the Alias documentation,
exit the Alias 2010 installer, download the courseware files
from the Alias Design Community Web site (http://aliasdesign.autodesk.com/)
and install the downloaded files. See Installing the tutorial courseware for
instructions.

