Assign a shader to a surface
using the Apply Shaders tool
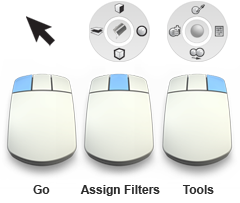
The Render > Apply Shaders  tool simplifies the workflow
for assigning shaders. The tool provides two menus that display
when you click the
tool simplifies the workflow
for assigning shaders. The tool provides two menus that display
when you click the  and
and  . Use these menus to assign
shaders to your models quickly and easily.
. Use these menus to assign
shaders to your models quickly and easily.
Using the , you can assign shaders
using four different filters.
The provides four tools that
perform shading functions.
To enter the Apply Shaders tool
. The view changes to decorate
mode and switches to hardware shade display (using the settings
defined in WindowDisplay > Hardware Display ❒). By default, only the
view and the Visualization panel show. You
can select which interface elements show by selecting Render
> Apply Shaders ❒.
The
tool also enters the last active tool, by default, Assign
by Component.

You can assign shaders using this tool, or you
can switch to a tool.
When you first press
the after entering the tool,
a help prompt appears under the control, instructing you to choose
an assignment mode. When you first press the after entering the tool,
a help prompt appears under the control, instructing you to choose
a tool state.
To exit the Apply Shader tool
To assign a shader
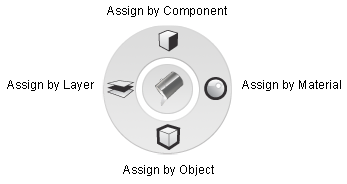
and drag to select an assignment
mode.
Assign by ComponentAssign the active shader to a single surface or mesh.
 Assign by Material
Assign the active shader to all the geometry that use the same material as the clicked geometry.
 Assign by Object
Assign the active shader to all the components that are grouped in the same object.
 Assign by Layer
Assign the active shader to all the geometry in the same layer as the clicked geometry.
 , click the geometry or drag
a box around it.
, click the geometry or drag
a box around it.
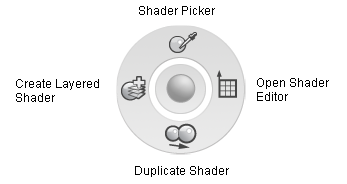
To pick a shader assigned to geometry and make the shader active
and drag to select the Shader
Picker  tool.
, click the geometry that
has the shader you are picking. The shader assigned to the clicked
geometry becomes active and the tool switches to the last active Apply tool.
tool.
, click the geometry that
has the shader you are picking. The shader assigned to the clicked
geometry becomes active and the tool switches to the last active Apply tool.
To edit the projected texture assigned to geometry
and drag to select the Open
Shader Editer  tool.
, click the geometry that
has the projected texture that you want to edit assigned to it.
tool.
, click the geometry that
has the projected texture that you want to edit assigned to it.
The Shader Editor displays, where you can edit the projected texture.
To duplicate the shader assigned to geometry
and drag to select the Duplicate
Shader  tool.
, click the geometry that
has the shader you want to duplicate assigned to it.
tool.
, click the geometry that
has the shader you want to duplicate assigned to it.
The shader assigned to the geometry is duplicated and then assigned to the geometry
To create a layered shader and add to it the shader assigned to geometry
and drag to select the Create
Layered Shader  tool.
, click the geometry with
the shader assigned to it that you want add to a new layer.
tool.
, click the geometry with
the shader assigned to it that you want add to a new layer.
A layered shader is created and the shader assigned to the picked geometry is added to the new layered shader. The layered shader is then assigned to the clicked geometry.