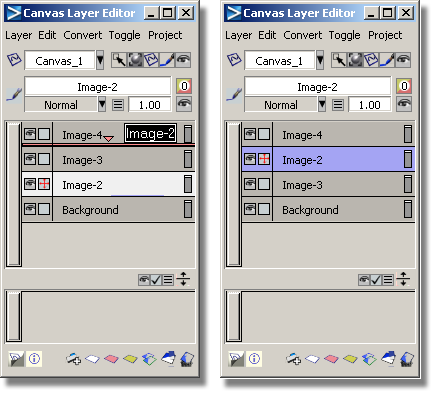
Use the left or middle mouse button to drag the image layer name in the Canvas Layer Editor window.
When a canvas plane contains more than one image layer, you can arrange the image layers in any order. For example, you can move an image layer so that it appears behind or in front of another image layer.
The order of the layers in the Canvas Layer Editor determines the stacking of the layers on the canvas. If a layer is above another layer in the editor, it will appear on top of that layer on the canvas.
You can move any number of image layers, mask layers, and folders at once.
To move image layers up or down
The layer appears blue.
 and
and  (Windows) or
  and
and  (Mac) keys to add other layers or folders
to the selection.
The new selected layers/folders appear in white.
 or
or  and drag the layers to the
desired location.
A small pink arrow points to the location.
When you drag image layers
with the  or
or  , a black box with the top
layer name follows the cursor.

A red horizontal line shows where the image layer will be moved to (when you release the mouse button).
For example, in the picture above, if you move Image-2 up and release the middle mouse button with the red horizontal line below Image-4, Image-2 will be moved just below Image-4.
To organize image layers into folders
To help categorize and group image layers, you can create folders in the Canvas Layer Editor. The folders are collapsible and expandable, to provide better viewing.
 at the bottom of the editor.