Show in Contents

Add to Favorites

Home: Alias Help

Work with the construction plane

Use construction aids

View or change the properties of objects and locators

Automatically create symmetrical
geometry
How to set a layer to automatically show the symmetrical
half as you create one half of a model.
Almost every real-world
model displays some form of symmetry. It is efficient to create half
of the model, then reflect it to create the other half. Symmetry
planes automate this process, by updating the symmetrical half as
you model.
Set the plane across which
the model will be mirrored
- Click the layer(s) for which you want
to set the symmetry plane.
- Choose Layers > Symmetry > Set Plane
 .
.
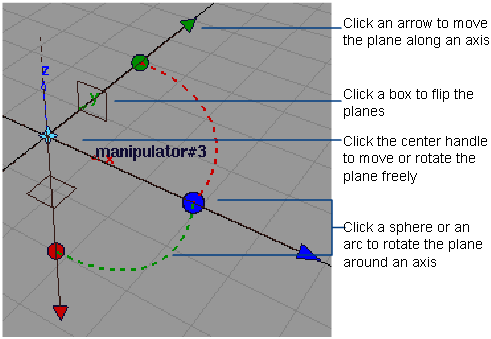
- Use the plane manipulator to set the
symmetry plane:
- Click Set Plane.
How do I use the plane
manipulator?
- To quickly snap the manipulator to the
end of a curve, click the center move handle, then use curve snapping
to snap the manipulator to the curve.
- Drag a handle to move or rotate.
- Click an arrow to change the center handle
to the free move handle. Then drag the center handle to move the
plane.
- Click a sphere to change the center handle
to the free rotate handle. Then drag the center handle to rotate
the plane.
Show or hide mirrored geometry
- Click the name of a layer that has a
symmetry plane set.
A white outline appears around
the name of the layer.
- Do one of the following:
Convert a mirrored half
into real geometry
- Select the layer or layers on which you
want to convert the mirrored geometry.
- Choose Layers > Symmetry > Create Geometry
 .
.
NoteThe mirrored geometry
becomes new geometry and is no longer affected by changes to the
other half.
TipThe geometry on the layer or layers is still
being mirrored. To improve performance, turn symmetry off in the Layers menu.
 .
.

 to show the mirrored half
for this layer.
 to hide the mirrored half
for this layer.
 .
.