Moves, resizes, and rotates the content of one or more image layers.
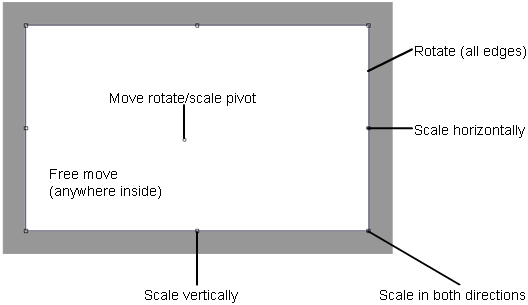
Choosing the tool displays a manipulator on the canvas layer. The manipulator covers the entire layer and lets you apply the transformations as shown in the following illustration.

 key and move the mouse in
the desired direction. You can also use the arrow keys to move by
small increments.
A context-sensitive cursor shows the current transform mode (move, scale, rotate) as you move the mouse over the manipulator.
The effect of the transformations is shown on the layer as you click and drag on the different handles. However, you must click the Accept button to apply the transformations permanently.
To input precise numerical values, use the option box.
For information on transforming image layers, see Move, scale, or rotate an image layer.
Transfor Image Control Options
Turn on this option if you want the sketch to update interactively as you transform the layer with the manipulator.
When transforming several large layers simultaneously, turning this option off speeds up the interaction.
Enter values for the horizontal and vertical translation amounts (in pixels).
Enter a value for the rotation angle (in degrees). Positive values rotate counter-clockwise around the rotation pivot.
Enter a value for the scale factor, as a percentage of the original size (100%).
A negative value mirrors the image.
Click this button once you are happy with the new position/orientation/size of your image and want to bake the transformed image into your layer.
The transformation can still be undone afterwards by using Edit > Undo.
Click this button to reposition the pivot at the geometrical center of the layer.
Click this button to undo all the transformations applied to the layer either through the manipulator or the option box.
Reset All does not undo transformations that have already been applied by clicking the Accept button.