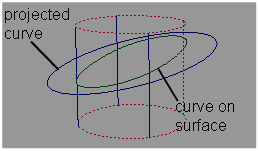
Instead of projecting along a single vector, projects the curve onto each point on the surface along the normal at that point.
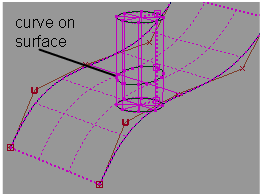
Create curves-on-surface from geometry
Create curves-on-surface from existing curves and surfaces by intersecting surfaces, projecting curves onto surfaces, and mapping curves onto surfaces.
There are four basic tools for creating curves-on-surface from existing curves:
This allows you to trim the surfaces back to the intersection.
This is like shining a flashlight at the curve, and turning the shadows on the target surfaces into curves-on-surface. The line between the flashlight, the curve, and the shadow is the projection vector.
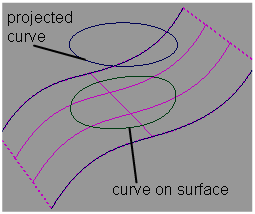
This tool is very useful for projecting curves that are parallel to or surround the target surface.
To create curves-on-surface at the intersection between two surfaces
 icon, or choose Surface
Edit > Create CurvesOnSurface > Intersect from
the palette.
icon, or choose Surface
Edit > Create CurvesOnSurface > Intersect from
the palette.
To project a curve or surface outline to create a curve-on-surface
Otherwise, create a reference vector to represent the projection direction.
 icon, or choose Surface
Edit > Create CurvesOnSurface > Project from the
palette.
icon, or choose Surface
Edit > Create CurvesOnSurface > Project from the
palette.
An indicator appears showing the projection vector.
This operation can take
some time depending on the complexity of the geometry. Press  to cancel the operation.
To project a curve along the surface normals to create a curve-on-surface
 icon, or choose Surface
Edit > Create CurvesOnSurface > Project Normal from
the palette.
icon, or choose Surface
Edit > Create CurvesOnSurface > Project Normal from
the palette.
The curve is projected onto all picked surfaces along the normals of the surfaces.
This
operation can take some time depending on the complexity of the
geometry. Press to cancel the operation.
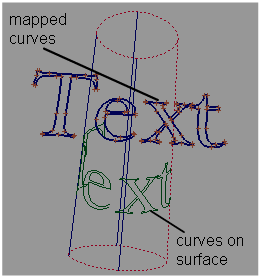
To map a curve onto a surface to create a curve-on-surface
 icon, or choose Surface
Edit > Create CurvesOnSurface > Geometry Mapping from
the palette.
icon, or choose Surface
Edit > Create CurvesOnSurface > Geometry Mapping from
the palette.
The curve is mapped onto the picked surface using the settings in the Geometry Mapping option window.
The following limitations
apply to the Surface Edit > Create CurvesOnSurface > Project , Surface Edit > Create CurvesOnSurface > Intersect , and Evaluate > Cross Section  tools:
Curves-on-surface – The projection results in curves-on-surface.
Curves – The projection results in free curves.
The accuracy of the match between the original curve and the curve-on-surface. The smaller the value, the more accurate the projection, but the longer the calculation time required.
For example, if the Tolerance is 0.01, the curve-on-surface must match the original curve within 0.01 units at each point that Project normal checks.
Number of times that each surface patch is subdivided to get an accurate result.
The default is 1, which is sufficient for most surfaces. Larger values increase calculation time. Only increase the value for very simple surfaces.
This option is only available if Create is set to Curves.
If this option is checked, the edit points from the original curves are projected on the surface(s), and the projected curves interpolate them, resulting in a similar number of spans.
If this option is not checked, the resulting curves will be better approximations of the projected sections from the original curves, but will likely contain more spans.
Save the history of the projection for later editing. If you turn Create History on, you can modify the curves and surfaces that were used to create the projected curves, and the projected curves will update.