This tutorial is intended to teach you how to do a sunrise over rippling water. In particular, we look at ways to deal with the problem of the large change in brightness as the sun rises.
Environment maps can be used as backgrounds and for reflections with spherical, cubic and chrome maps.
You should be familiar with the explanation of the "Sky" procedure in Part 3 of this manual, and in the Shader section of Rendering in Alias. It describes the various parameters which control the simulation of a planetary atmosphere. As well, the explanations of water waves and ripples and Water in the Natural Phenomena section discuss the principles used to create water and detail the parameters for Water.
The water in this scene consists of a single flat patch with waves on the surface of the patch created using a bump map of the Water procedure. This patch stretches from -200 to 200 units along the x and z axes. This ensures that, when viewed from the eye point, the water plane stretches to the horizon.
The background is a direct view of the procedural environment "Sky". This is also used as a reflection map on the patch to show the sky reflected in the water.
There are several primary processes in the animation. The first is the movement of the water waves across the patch. The second is the movement of the sun as it rises above the horizon. The third is the translation of the clouds across the sky. The clouds also become thinner as the day progresses. A secondary process in the animation is the use of the brightness variables to compensate for the enormous changes of brightness which occur during a sunrise.
Each of these processes is now discussed in some detail.
Since relative displacement maps affect the underlying geometry, to get a realistic level of detail a very high level of subdivision would have to be used; to get around this, a bump map was used instead, and an "amult" value of 0.01 was chosen. The choice of small amplitude waves avoided the expense of using a displacement map instead of a bump map. The large extent of the water patch would have required "urepeat" and "vrepeat" to be 300 for the individual nearby waves to look a reasonable size. This, in turn, would have led to the need for udivisions and vdivisions for the patch of about 1000. This would generate so many triangles that the renderer would run out of memory. A bump map, on the other hand, affects the normal at the point of intersection and leaves the geometry unchanged, so the entire area can be characterized using the minimal two triangles (udivisions and vdivisions of 1).
The "wave_frequency_step" of 0.125 was chosen so as to have several waveforms of almost the same frequency superimposed on top of each other. Large values lead to repetitive, unattractive waves.
The "wave_time" is made of a function of the frame number "frame". In this way the waves move smoothly from frame to frame. The "blurmult" and "bluroffset" values mean that the water is sampled in a very small area to compute the slope. This prevents the water from looking flat near the horizon. The only correct way to antialias bump maps is to supersample them everywhere. Blurring the bump map texture merely blurs out the detail. An "aathreshold" of zero ensures supersampling for every pixel. The "aalevel" of 2 was chosen since it reduced aliasing artifacts without making the rendering time completely prohibitive.
The sun position is defined in terms of azimuth and elevation angles with respect to the earth. Since the real world rotates, the sun moves across the sky. The correct astronomical animation would be to rotate these angles at a uniform speed. However, for this animation we want the sun to rise quickly at the beginning, and gradually come to a stop. This was achieved by using an ease function.
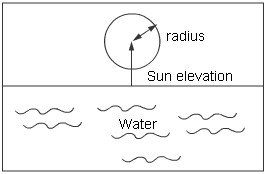
The field of view for this animation was chosen to be 90°. This has the advantage that large color changes take place over an angle of 90° for a more striking image. However, the large fov has several disadvantages. First, if the sun were to have its real diameter of 1/2 degree, it would be tiny on the screen. Secondly, a sphere near the edge of a perspective image projects onto the screen as an ellipse, not a circle. This effect gets worse as the field of view increases.
Unfortunately an elliptical sun looks wrong. Fortunately there is an optical effect in the real world's atmosphere which bulges the sun horizontally for low elevations. Thus an "aspect" ratio was chosen which made the sun circular when high in the sky and squashed when low in the sky. If other pieces of geometry are rendered at the same time, they may be laterally distorted, but for this animation it worked.
The sun radius value is changed to compensate for the elongation. It is also much larger than the real sun would appear.
The clouds in the sky were created by using the 8 bit pix file FractalBW. This is a fractal texture which wraps at its edges and creates realistic looking clouds. Any pix file could be used. The clouds could be a scanned-in logo or an animated matte sequence if desired. The clouds for this piece were animated in two ways. First, they were translated across the sky by moving the "cloud_xoffset" and "cloud_yoffset" linearly with the frame number. Also, to simulate the thinning of the clouds as the sky warmed up, the cloud_threshold was changed exponentially as a function of the frame time.
Compensating for Brightness Changes
A problem with accurate simulations of sunrises and sunsets is that the brightness of the sky changes by several orders of magnitude. As the sun comes up it gets brighter. In real photography an exposure long enough to catch the subtle beauty of dawn would be whited out by a mid morning sky. In the same way, the computer graphics medium only handles about one order of magnitude of contrast. We need to compensate for this by using a multiplicative "brightness" factor.
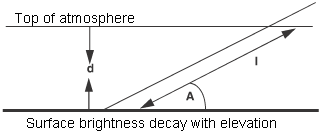
The illustration above shows that for large radius planets the distance through the atmosphere for a ray at angle A is approximately:
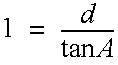
A, in this example, is equivalent to the sun's elevation. The brightness decays exponentially with the distance through the atmosphere. However, for this example, the brightness was made proportional to 1/(l + c) where c prevented the brightness becoming infinite for l = 0. This compensation works fairly well, although the sun does flare up slightly half way through the animation. You can try more sophisticated compensation, although we suggest that you investigate these effects using non-antialiased very low resolution images.
A Caveat About Rendering Times
Both "Water" and "Sky" are very expensive procedures. The water model which covers half the screen, is time consuming because it is a time dependent procedure which treats each frequency separately. This time is proportional to the area of the water in screen space. For an NTSC image with an anti-aliasing level (aalevel) of 2 and an anti-aliasing threshold (aathreshold) of zero, the water procedure adds twenty minutes to the rendering time on an SGI 4D workstation.
The sky procedure is also extremely costly. It involves a double integral through the atmosphere. For the same NTSC image, as above, having the sky both as a reflection map on the water and as a background, adds forty minutes to the rendering time on an SGI 4D workstation.
At an hour per frame you may ask why bother? The answers are two-fold. First, the results are rather beautiful and second, the sky procedure will be better understood. One particular time of day (sun elevation) may be rendered once into a cubic environment map and then used for backgrounds and reflections for an entire animation sequence. That is not done here because we change the sky parameters as a function of time.


