Light Data Type


Declaration:

light <name> (procedure=<procedure name>, <component list> ) ;

Reference:

<name> ( )

Literal:

light (<component list>)

Purpose:

This defines a source of illumination.

Comments:

A light is an object that may be instanced in the MODEL Section. Light is used to illuminate a scene when the rendering mode is raytrace or raycast. Lights are ignored when the rendering mode is wireframe. Only lights of type spotlight can cast a shadow in the RayCaster, but any type of light may cast a shadow in the RayTracer. A light may be specified as a literal or a variable. If specified as a variable, it must have a name. Any of the following components may be given between the parentheses. Please note that particle system components are described following the light data type section.

All components are specified using a keyword=value form. The components may appear in any order. When more than one component is used, they must be separated by commas. Not all components are optional. Components which are not specified take on their default value. If any component is specified more than once, the last such specification will be used, and all previous ones will be ignored. Not all components are meaningful in all combinations. In situations where a component is not meaningful, any specification of it will be ignored with no ill effect.

Example:

light sun(model=directional, direction=(1,1,1));

active

Syntax:

active = <scalar>

Range:

0 (FALSE) or not 0 (TRUE).

Default:

TRUE

Purpose:

A switch which turns the light off if it is FALSE and on if it is TRUE.

Comments:

This component may be animated. active is appropriate for all lighting models.

Example:

active = fmod(frame,2)

ambient_shade

Syntax:

ambient_shade = <scalar>

Range:

0.0 to 1.0. Values outside this range are replaced by 0 or 1 as appropriate, and a warning is issued.

Default:

0.5

Purpose:

Defines the omnidirectionality of an ambient light.

Comments:

This component may be animated. If ambient_shade is set to 0.0, the total illumination will come from all directions and objects will show no edge definition. Set to 1.0, the illumination will come solely from the light position and objects will show definite edge contrast. ambient_shade is only appropriate for the ambient lighting model.

Example:

ambient_shade = 1.0

arc

Syntax:

arc = <scalar>

Range:

0.0 to 360.0

Default:

360

Purpose:

This value defines the portion of the swept volume. A value of 360 degrees represents the entire volume.

Comments:

This value is only applicable to the CONE, SPHERE, TORUS and CYLINDER volume lights.

Example:

arc = 360.0

bias

Syntax:

bias = ( <scalar> , <scalar> )

Range:

Non-negative.

Default:

( 0.3, 0.4 )

Purpose:

This parameter is now obsolete

Used for RayCasting only. The two <scalar>s are interpreted as the minimum and maximum values, respectively. Together they define the range for which each surface point is randomly moved towards the eye before it is determined whether or not it is in shadow. The minimum must be smaller than the maximum. Either or both of the <scalar>s may be animated.

Comments:

The bias component is required to prevent incorrect self shadowing on an object when a z value of a point on the surface is compared to the depth map z from a nearby, but different point on the same surface. If the depth map z is smaller, the point on the surface will appear to be in shadow when it isn’t. The stochiastic bias allows the user to correct this while still allowing a surface to curve over and legitimately shadow itself without aliasing. This, unfortunately, has the effect of moving the shadow boundary away from its true position. bias values must therefore be large enough to eliminate self-shadowing artifacts, yet small enough to avoid any noticeable problems from the offset boundary positions.

From a practical point of view, the minimum and maximum bias are measured in world space and therefore depend on the size of the scene. For a 100 x 100 x 100 scene, a typical bias would be 0.3 to 0.4. If the shadow looks ragged in places, increase the minimum and/or maximum. If the shadow boundary has moved noticeably and looks incorrect, decrease the minimum and/or maximum. For a 10 x 10 x 10 scene, a bias of 0.04 to 0.07 works well.

bias is appropriate for the spotlight lighting model. It is ignored for point, infinite and ambient lights. It is ignored even for spotlights if shadow has not been set to TRUE. Note that depth maps are only used for RayCasting.

Example:

bias = (0.4, 0.7)

color

Syntax:

color = <triple>

Range:

-infinity to infinity

Default:

( 255.0, 255.0, 255.0 )

Purpose:

This defines the color of the light.

Comments:

This component may be animated. A color component is appropriate for all lighting models. Note that if you use a negative number, the light will suck illumination away from the scene.

Example:

color = ( 0, 0, 255 )

concentric

Syntax:

concentric = <scalar>

Range:

-1.0 to 1.0

Default:

1.0

Purpose:

This value defines how much the in-out direction contributes to the light direction.

This value defines the intensity of light radial to the light's central axis. For a spherical volume light, a value of 1 imitates a point light with all illumination moving out from the center. A value of -1 reverses that effect so that illumination comes from the outside of the sphere towards the central axis. With a value of 0, directional and radial values must be used to give illumination direction along the major axis or radially around the major axis.

Example:

concentric = 0.25

cone_end_radius

Syntax:

cone_end_radius = <scalar>

Range:

-infinity to infinity

Default:

0.1

Purpose:

This value defines the radius of the end of the cone. A value of 0 makes the volume light a true cone, whereas a value of 1 effectively reduces the shape of the light to a cylinder. This value may be negative, which will have the effect of reversing the direction of the cone.

Comments:

This value is only applicable to the CONE volume light.

Example:

cone_end_radius = 1.0

decay

Syntax:

decay = <scalar>

Range:

0, 1, 2, or 3. The value given is treated as an integer.

Default:

0

Purpose:

This is used to determine how intensity decreases with distance.

Comments:

This component may be animated. Set decay to 0 for constant intensity (the light shines forever). Set decay to 1 for a decrease that is proportional to the distance from the light. Set decay to 2 for a decrease that is proportional to the square of the distance.Set decay to 3 for a decrease that is proportional to the cube of the distance. decay is appropriate for point and spot lighting models. It is ignored for directional and ambient lights.

For volume lights,

No decay light reaches everything within the volume, nothing outside.
>0 Light intensity decreases from the center towards the edges of the volume.
0.5 linear dropoff from the middle to the edges. With a value close to 1, intensity drops off very fast from the middle With a value close to 0, intensity drops off slowly in the middle and fast near the edges.
<0 Light intensity decreases from the edges towards the middle
Shape Decay
BOX and SPHERE all directions from the center
CYLINDER and CONE in the direction of the principal axis
TORUS perpendicular to the principal axis

Example:

decay = 2

decay_start

Syntax:

decay_start = <scalar>

Range:

0.0 to 1.0

Default:

0.0

Purpose:

This value defines how far out from the centre of the volume the decay starts.

Example:

decay_start = 0.0

depth_input

Syntax:

depth_input = <filename>

Range:

none

Default:

none

Purpose:

This is only relevant for a shadow-casting spot light. If there is a depth_input file, then instead of generating the shadow map (expensive), it reads this file instead to get the depth values. This is useful only for non-moving objects and lights within the scene.

Example:

depth_input = “depth_input_file”

depth_output

Syntax:

depth_output = <filename>

Range:

none

Default:

none

Purpose:

This is only relevant for a shadow casting spot light. If there is a depth_output file, then the shadow map generated is written to this file. This is useful if the depth_input is also the same filename, which means the renderer will generate the depth map just once, and write it to this file, then reuse it for subsequent frames.

Example:

depth_output = “depth_output_file”

direction

Syntax:

direction = <triple>

Range:

unbounded, but cannot be (0,0,0).

Default:

( 0.0, 0.0, 1.0 )

Purpose:

This simulates placing the source of illumination at infinity.

Comments:

The triple provides a direction vector pointing towards the light. The magnitude of the vector is immaterial. This component may be animated using a motion path, or by otherwise varying the value of the triple. direction is appropriate for the directional lighting model. It is ignored for point, spot, ambient, area and linear lights

Example:

direction=(1,1,1)

directional

Syntax:

directional = <scalar>

Range:

-1.0 - 1.0

Default:

0.0

Purpose:

This value defines how much the primary axis direction contributes to the light direction

Comments:

For volume lights only.

Example:

directional = 1.0

directionality

Syntax:

directionality = <scalar>

Range:

0.0 - 1.0

Default:

1.0

Purpose:

This value defines how much the direction of the light is taken into account in the lighting calculation. A value of 0 acts like an ambient light; a value of 1 acts like a directional light.

Comments:

For volume lights only.

Example:

directionality = 1.0

directional_turbulence

Syntax:

directional_turbulence = <boolean>

Range:

ON/OFF

Default:

ON

Purpose:

Used to define a wind field.

Comments:

Turbulence is mostly used when the volume light is used to define a wind field, but it also defines the light direction, and can be used to get flickering sorts of light effects. The turbulence is defined as if it were inside a “box”, and the box is placed appropriately when you need to evaluate the turbulence at a point.

Example:

directional_turbulence = ON

dropoff

Syntax:

dropoff = <scalar>

Range:

If a negative number is provided, 0 is used; no error message is given. Although any positive real number can be used, the dropoff will be severe beyond the range of 5-7; numbers greater than 20 have little effect unless intensity is quite high.

Default:

0

Purpose:

dropoff describes the rate at which illumination will fall off from the center of a spot light to the edge of the cone of illumination (determined by the angle set in spread). A value of 0 means there is no dropoff — the edge is as bright as the center.

For volume lights, this value controls the rate at which light intensity decreases from the center to the edge of the light. It only applies to CONE and CYLINDER types of volume lights, and the dropoff is away from the principal axis of the light. The range is from 0 to infinity. The range usually used is from 0 to 50. Values of 1.0 and less give practically identical results, that is no discernible intensity decrease along the radius of the beam. The default value is 0.0, which means there is no dropoff. This is very similar to the way that spotlights work.

Comments:

This component may be animated. dropoff is appropriate for the spot lighting model. It is ignored for point, directional and ambient lights.

Example:

dropoff = 0.5

dropoff_start

Syntax:

dropoff_start = <scalar>

Range:

0.0 to 1.0

Default:

0.5

Purpose:

This value defines how far out from the centre axis of the volume the drop-off starts.

Example:

dropoff_start = 0.5

flare_color

Syntax:

flare_color = <triplet>

Range:

-infinity to infinity

Default:

(160, 160, 255)

Purpose:

If textured then each circle in the flare will contain the texture, scaled to exactly fit inside the circle. Circular ramp textures can be used to create colorful rainbow flare effects.

Example:

flare_color = (160, 160, 255),

flare_color_spread

Syntax:

flare_color_spread = <scalar>

Range:

0 to 1

Default:

0.5

Purpose:

This is the amount that the hue of individual circles is randomized about the flare color. Note that the flare_color must be at least partially saturated (that is, not white or grey) to see this effect.

Example:

flare_color_spread = 0.5,

flare_focus

Syntax:

flare_focus = <scalar>

Range:

0 to 1

Default:

0.6

Purpose:

This controls the sharpness of circle edges. At a value of 1, the edges are totally sharp, at zero the circles are very blurry.

Example:

flare_focus = 0.6,

flare_horizontal

Syntax:

flare_horizontal = <scalar>

Range:

-infinity to infinity

Default:

0

Purpose:

This parameter, with flare_vertical, controls the axis of the flare effect relative to the center of the image. As the light source moves, the flare will appear to rotate through this point.

Example:

flare_horizontal = 0,

flare_intensity

Syntax:

flare_intensity = <scalar>

Range:

0 to infinity

Default:

1

Purpose:

This is the scale for the brightness of the flare effect.

Example:

flare_intensity = 1,

flare_length

Syntax:

flare_length = <scalar>

Range:

0 to infinity

Default:

1

Purpose:

This controls how long the flare effect is relative to the light location. If the value is small, then all the circles in the flare will bunch up on the light. If it is large then the circles will get spread out off the edge of the image.

Example:

flare_length = 1,

flare_num_circles

Syntax:

flare_num_circles = <scalar>

Range:

0 to infinity

Default:

20

Purpose:

This is the number of spots created along the length of the flare effect.

Comment:

Very large numbers of spots can be expensive to render, especially if the size is large and the flare color is textured.

Example:

flare_num_circles = 20,

flare_max_size

Syntax:

flare_max_size = <scalar>

Range:

-infinity to infinity

Default:

1

Purpose

The size of the circles is randomized between these two values.

Example:

flare_max_size = 1,

flare_min_size

Syntax:

flare_min_size = <scalar>

Range:

-infinity to infinity

Default:

0.1

Purpose:

The size of the circles is randomized between flare_min_size and flare_max_size.

Example:

flare_min_size = 0.1,

flare_vertical

Syntax:

flare_vertical = <scalar>

Range:

-infinity to infinity

Default:

0

Purpose:

This parameter, with flare_horizontal, controls the axis of the flare effect relative to the center of the image. As the light source moves, the flare will appear to rotate through this point.

Example:

flare_vertical = 0,

fog_intensity

Syntax:

fog_intensity

Range:

-infinity to infinity

Default:

1.0

Purpose:

Set the brightness of the fog illumination.

Comments:

The fog illumination simulates a 3D volume of scattered light. Point lights simulate a spherical volume of fog. If the fog_intensity is too high, then the glow will look like a glowing orb. Use glow and/or halo effects in conjunction with fog glow when a bright, focused center to the glow is desired.

Example:

fog_intensity = 0.5

fog_opacity

Syntax:

fog_opacity = <scalar>

Range:

-infinity to infinity

Default:

0.0

Purpose:

To allow an illuminated fog to obscure objects.

Comments:

Normally the fog glow is added on top of the light in the scene. If the opacity is greater than zero, then the fog will be more opaque where it is brightest. This is useful when simulating fire and smoke effects, which frequently do not let all the light in a scene pass through. Black smoke can be created by making the light color near black and the opacity high (around 10.0).

Example:

fog_opacity = 5.0

fog_radial_noise

Syntax:

fog_radial_noise = <scalar>

Range:

-infinity to infinity

Default:

0.0

Purpose:

To simulate explosion and starburst effects.

Comments:

Similar to glow_radial_noise.

NoteThis effect is currently two-dimensional.

Example:

fog_radial_noise = 0.5

fog_samples

Syntax:

fog_samples= <scalar>

Range:

Any value greater than 0 up to the resolution of the shadow depth map.

Default:

50

Purpose:

This parameter is only relevant when light fog shadows are to be computed. The higher the value for this parameter, the better the fog shadow quality. Usually, the default is good enough, but sometimes where there is little detail, such a value can miss important fog shadow features, or produce noisy results. By increasing this value (up to the depth map resolution), the quality will be increased, but so will the performance.

Example:

fog_samples = 50;

fog_spread

Syntax:

fog_spread = <scalar>

Range:

-infinity to infinity

Default:

1.0

Purpose:

fog_spread has different effects on point lights and spot lights. On point lights, it determines the size of the glowing spherical volume of fog. On spotlights, it determines how concentrated or focused the beam is (higher fog_spread creates more uniform spotlight beams, while at lower values, the center of the beam will appear brighter).

Comments:

Use the decay parameter on spot lights to modify the way the beam falls off with distance from the lightsource.

Example:

fog_spread = .2

fog_star_level

Syntax:

fog_star_level = <scalar>

Range:

-infinity to infinity

Default:

0.0

Purpose:

To create radial explosion effects and control fog glow direction.

Comments:

See glow_star_level.

Example:

fog_star_level = 1.0

fog_type

Syntax:

fog_type = OFF | LINEAR_GLOW | EXPONENTIAL_GLOW | BALL_GLOW

Range:

0 (OFF) to 3 (BALL_GLOW)

Default:

OFF

Purpose:

The fog_type specifies the way that the intensity of fog illumination falls off from the center of the light.

Comments:

All different types currently produce a LINEAR_GLOW; however, BALL_GLOW will provide sharper thresholds at the edge when fog_opacity is not 0.0. In spot lights, the decay will determine how fast the light falls off from the center of the light.

Shadows can be cast into volumes of fog by using spot lights with shadow = ON and fog_type = LINEAR_GLOW (Raycaster Only).

Currently fog glow is only available for point lights and spot lights.

Example:

fog_type = LINEAR_GLOW

fog_2D_noise

Syntax:

fog_2D_noise = <scalar>

Range:

-infinity to infinity

Default:

0.0

Purpose:

Simulate smoke and fire effects using two-dimensional noise.

Comments:

The noise is generated on a plane that is centered at the location of the light and always oriented towards the line of sight. To create the illusion of illuminated smoke around a glowing light source, set fog_2D_noise to about 0.5 and animate slowly the noise_uoffset and noise_voffset values. The smoke will appear to slowly drift by the light.

If a spotlight is rotated, the beam will appear to move through smoke in a room. If you want the noise to remain locked on to the beam as it moves (for example, for a rocket thruster), the glow_rotation will need to be animated to match the spotlight orientation.

Example:

fog_2D_noise = .5

force_type

Syntax:

force_type = OFF | GRAVITY | MAGNET | WIND | DRAG

Range:

As above

Default:

OFF

Purpose:

To define force emission from a light.

Example:

force_type = GRAVITY

force_intensity

Syntax:

force_intensity = <scalar>

Range:

-infinity to infinity

Default:

1.0

Purpose:

To set the intensity of the force.

Example:

force_intensity = 1.0

glow_intensity

Syntax:

glow_intensity = <scalar>

Range:

-infinity to infinity

Default:

1.0

Purpose:

Set the brightness of the light glow.

Comments:

If the light has a non-zero decay, then the brightness of the glow will vary with the distance of the light. As the glow of the light becomes intense, the size of the glow will appear to increase, especially when the center of the glow washes out. This simulates what would naturally happen with a real light and film. Negative glows will tend to subtract from other glows, thus a light with a negative BALL_GLOW could be put along with a light with a standard glow, resulting in a hole in the center of the glow.

Example:

glow_intensity = 3.0

glow_opacity

Syntax:

glow_opacity = <scalar>

Range:

-infinity to infinity

Default:

0.0

Purpose:

To allow a light glow to obscure objects.

Comments:

Normally the light glow is added on top of the light in the scene. If the opacity is greater than zero, then the glow will be more opaque where it is brightest. This is useful when simulating fire and smoke effects, which frequently do not let all the light in a scene pass through. However, it is generally better to use a fog glow for these effects. Also, if you want the glow to appear on the background only, and not obscure any objects, then an opacity value of -1 will do this.

Example:

glow_opacity = 5.0

glow_radial_noise

Syntax:

glow_radial_noise = <scalar>

Range:

-infinity to infinity

Default:

0.0

Purpose:

To simulate starburst effects and eyelashes refracting light.

Comments:

Negative values will create a thicker noise. Use the radial_noise_frequency to adjust the smoothness of this effect.

Example:

glow_radial_noise = 0.5

glow_rotation

Syntax:

glow_rotation = <scalar> (in degrees)

Range:

-infinity to infinity

Default:

0.0

Purpose:

To rotate the various glow and fog noise and star effects about the location of the light.

Comments:

Affects glow_2D_noise, fog_2D_noise, glow_star_level, fog_star_level, glow_radial_noise and fog_radial_noise.

Example:

glow_rotation = 45.0

glow_spread

Syntax:

glow_spread = <scalar>

Range:

-infinity to infinity

Default:

1.0

Purpose:

glow_spread determines the general size of the glow effect.

Comments:

glow_spread also affects the size of the SPECTRAL and RAINBOW effects. Negative values can have odd but useful effects. For example if the glow_spread = -6.0 and the glow_2D_noise = 1.0, an image of a fiery bubble is created.

Example:

glow_spread = 0.1

glow_star_level

Syntax:

glow_star_level = <scalar>

Range:

-infinity to infinity

Default:

0.0

Purpose:

To simulate camera star filter effects.

Comments:

This is often effective when combined with a high frequency glow_radial_noise. Use star_points to set the number of points on the star. If the star_points = 1.0, comet like effects are possible. The star can be rotated by using glow_rotation.

Example:

glow_star_level = 4.0

glow_type

Syntax:

glow_type = OFF | LINEAR_GLOW | EXPONENTIAL_GLOW | BALL_GLOW | SPECTRAL | RAINBOW | LENS_FLARE

Range:

0 (OFF) to 6 (LENS_FLARE)

Default:

OFF

Purpose:

The glow_type specifies the way that the intensity and color of a light glow falls off from the center of the light.

Comments:

OFF NO glow.
LINEAR_GLOW glow slowly diminishes from center of light
EXPONENTIAL_GLOW glow quickly diminishes from center of light
BALL_GLOW glow diminishes faster towards a distance from glow center specified by the glow_spread.
SPECTRAL lower wavelengths (red) refract (or spread) more than the higher frequencies (blue).
RAINBOW simulates refraction due to water droplets in air. The radius of the rainbow is determined by the glow_spread parameter.
LENS_FLARE concentric circles of color.

All the parameters associated with light glow work with all of the glow types. For instance a RAINBOW glow may be combined with glow_star_level of 1.0 and star_points of 4 to create a colored refraction grating effect.

Example:

glow_type = EXPONENTIAL

glow_2D_noise

Syntax:

glow_2D_noise = <scalar>

Range:

-infinity to infinity

Default:

0.0

Purpose:

Simulate smoke and fire effects using a two-dimensional noise.

Comments:

The noise is generated on a plane that is centered at the location of the light and always oriented towards the line of sight. To create the illusion of illuminated smoke around a glowing light source, set glow_2D_noise to about 0.5 and animate slowly the noise_uoffset and noise_voffset values. The smoke will appear to slowly drift by the light.

Generally fog glow (fog_2D_noise) is better for creating smoke and fire effects, because these are 3D effects. (glow_2D_noise cannot be occluded by objects, for example.)

Example:

glow_2D_noise = .5

halo_intensity

Syntax:

halo_intensity

Range:

-infinity to infinity

Default:

1.0

Purpose:

Set the brightness of the light halo..

Comments:

If the light has a non-zero decay, the brightness of the halo will vary with the distance of the light. As the halo of the light becomes intense, the size of the halo will appear to increase, especially when the center of the halo washes out.

Example:

halo_intensity = 3.0

halo_spread

Syntax:

halo_spread = <scalar>

Range:

-infinity to infinity

Default:

1.0

Purpose:

halo_spread determines the general size of the glow effect.

Comments:

halo_spread also affects the size of the RIM_HALO. Halo spread is generally greater than the spread of the glow when the values are the same.

Example:

halo_spread = 0.1

halo_type

Syntax:

halo_type = OFF | LINEAR_GLOW | EXPONENTIAL_GLOW | BALL_GLOW | LENS_FLARE | RIM_HALO

Range:

0 (OFF) to 5 (RIM_HALO)

Default:

OFF

Purpose:

The halo_type specifies the way that the intensity and color of a light halo falls off from the center of the light.

Comments:

OFF NO halo.
LINEAR_GLOW halo slowly diminishes from center of light
EXPONENTIAL_GLOW halo quickly diminishes from center of light
BALL_GLOW halo diminishes faster towards a distance from glow center specified by the halo_spread.
LENS_FLARE simulates a bright light source illuminating the surfaces of several camera lenses. The intensity of the flare is determined by the halo_intensity. The size of the circles created is relative to the field of view of the camera.
RIM_HALO This forms a circular ring with a soft central glow. The size of the ring is determined by the halo_spread. The halo of a light is much the same as its glow, except the falloff is generally more gradual, and different falloff types are available.

Example:

halo_type = LENS_FLARE

hexagon_flare

Syntax:

hexagon_flare = <boolean>

Range:

Boolean(ON/OFF)

Default:

OFF

Purpose:

This turns on Hexagon shaped flare elements (instead of circles). Other shapes are possible by texture mapping the flare color with an image of the desired shape (white on black).

Example:

hexagon_flare = OFF,

intensity

Syntax:

intensity = <scalar>

Range:

-infinity to infinity

Default:

1.0

Purpose:

This sets the brightness of the light.

Comments:

This component may be animated. The value is checked at usage time, and if negative, stops execution. Set intensity to 0.0 for no illumination, 1.0 for normal illumination; 5.0 would be a very bright illumination. If you set intensity to a negative number, it will suck light away from the scene.

Example:

intensity = 2

LENS_FLARE

Syntax:

LENS_FLARE = <boolean>

Range:

Boolean (OFF/ON)

Default:

OFF

Purpose:

To turn lens flare on or off.

Example:

LENS_FLARE = ON

model

Syntax:

model = ambient | area | directional | linear | point | spot | volume

Range:

As enumerated above.

Default:

None. Must be specified.

Purpose:

Specifies the lighting model used for this light. The possibilities are:

ambient This is similar to a point light, except that only a portion of the illumination emanates from the point. The remainder of the illumination comes from all directions and lights everything uniformly.
area This is similar to a point light, except the source of illumination is rectangular.
directional In this case, the source of illumination is infinitely far away from the scene. The actual position of the light data item in the scene description is immaterial. Its orientation, however, is used. Rotations will affect the direction of the light.
linear This is similar to a point light, except the source of illumination is a line of light placed in the scene.
point This is the case where light emanates from a point somewhere in the scene. That point is the same as the position of the light object in the scene description. (That is, the origin of the light is (0,0,0) relative to the light object, and is transformed using current_transformation.) Note that the light emanates in all directions.
spot This is similar to a point light in that it is a point source, and it exists somewhere in the scene. It is different, however, in that it radiates illumination in a cone about a specific direction. The position of the source in the scene is the same as the position of the light object in the scene description. (That is, the origin of the light is (0,0,0) relative to the light object, and is transformed using current_transformation.)
volume defines a closed volume in which objects will be illuminated, and nothing outside the volume is directly illuminated by the light. Within the volume, the direction and intensity can vary in many different parameters. A volume light is a convenient way to “link” a light spatially, instead of by object. The main use of the volume light is to be a force field generator and particle emitter.

Comments:

The lighting model is not animatable. The value is checked to be one of the above at definition time. Improper specification terminates execution with an error message.

Example:

model = directional

noise_threshold

Syntax:

noise_threshold = <scalar>

Range:

0 to 1.0

Default:

1.0

Purpose:

This is a cutoff value for 2D noise. As the threshold is lowered to zero, fog_2D_noise and glow_2D_noise break up into smaller and smaller particles.

Comments:

This is useful for simulating globular clusters, ejecta from explosions, snow and rain effects, especially when the noise u and v scale is high. It can also help make flames and smoke more patchy.

Example:

noise_threshold = 0.8

noise_uoffset

Syntax:

noise_uoffset = <scalar>

Range:

-infinity to infinity

Default:

0.0

Purpose:

To offset the horizontal position of 2D noise.

Comments:

Can create the look of smoke moving past a light when animated. Rain and snow effects are also possible.

NoteThe noise will wrap after an offset of 1.0, which is useful in creating animated loops.

Example:

noise_uoffset = .5

noise_uscale

Syntax:

noise_uscale = <scalar>

Range:

0 to infinity

Default:

1.0

Purpose:

To change the scale of glow_2D_noise and fog_2D_noise in the horizontal.

Comments:

This is useful for creating effects like layered fog and tall flames. Also, if the noise_uscale and noise_vscale are animated from high to low values, the noise will appear to fly apart like an explosion.

Example:

noise_uscale = 3.0

noise_voffset

Syntax:

noise_voffset = <scalar>

Range:

-infinity to infinity

Default:

0.0

Purpose:

To offset the vertical position of the 2D noise.

Comments:

Can create the look of smoke moving past a light when animated. Rain and snow effects are also possible.

Notethe noise will wrap after an offset of 1.0, which is useful in creating animated loops.

Example:

noise_voffset = .5

noise_vscale

Syntax:

noise_vscale = <scalar>

Range:

0 to infinity

Default:

1.0

Purpose:

To change the scale of the glow and fog 2D_noise in the vertical.

Comments:

This is useful for creating effects like layered fog and tall flames. Also, if the noise_uscale and noise_vscale are animated from high to low values, the noise will appear to fly apart like an explosion.

Example:

noise_vscale = 3.0

penumbra

Syntax:

penumbra = <scalar>

Range:

absolute: -90, 90 (degrees)

useful range: -20, 20

Purpose:

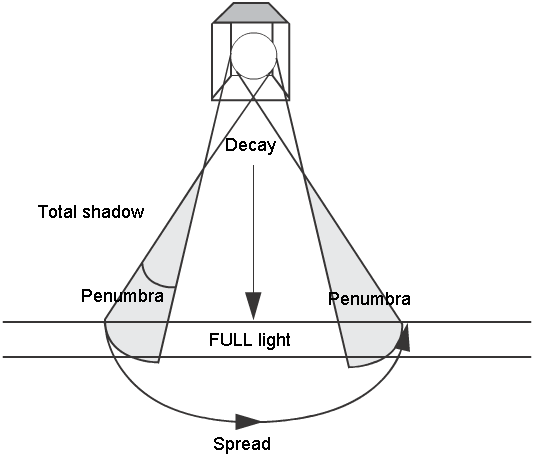
To determine the softness of the spot light’s edge. It is defined in degrees that are relative to the edge of the spotlight’s spread.

The following illustrates the penumbra as the area where light falls when a light bulb is partially eclipsed by a lamp shade. A penumbra displays the region of partial shadowing of the dimension of the light source.

Comments:

This component may be animated.

Example:

penumbra = 20.0,

radial

Syntax:

radial = <scalar>

Range:

-1.0 - 1.0

Default:

0.0

Purpose:

This value defines how much the spin direction contributes to the field value.

Comments:

For volume lights only.

Example:

radial = 0.0

radial_noise_frequency

Syntax:

radial_noise_frequency = <scalar>

Range:

-infinity to infinity

Default:

0.5

Purpose:

To control the smoothness of the glow and fog radial noises.

Comments:

See glow_radial_noise.

Example:

radial_noise_frequency = 3.0

shadow

Syntax:

shadow = <scalar>

Range:

0 (FALSE) or not 0 (TRUE)

Default:

FALSE

Purpose:

A boolean indicating whether this light will cast shadows or not. If shadow is TRUE, the light will cast shadows.

Comments:

This component may be animated. For RayCasting, shadow is appropriate for the spot lighting model and ignored for point, directional and ambient lights. For RayTracing, shadow is appropriate for all lighting models.

Example:

shadow = TRUE

shadow_dither

Syntax:

shadow_dither = <scalar>

Range:

0.0 to 1.0

Default:

1.0

Purpose:

Values less than 1.0 allow a tradeoff between soft jittered shadow edges and less noisy but more defined shadow edges.

Comments:

Used with soft shadowing in the raytracer. If this value is zero, then the soft shadows will break apart into multiple shadows, determined by the shadow_samples parameter. If shadow_samples = 4, then the light will appear to cast 4 separate shadows. The separation of the shadows is determined by the light radius and the distance of the light away. As the shadow_dither parameter is increased to 1.0, the four shadows would then each spread until they merged into one soft shadow.

Notefor animations it is best to leave this parameter at 1.0, because the shadows may move a little as the view changes.

SEE soft_shadows.

Raytracer ONLY.

Example:

shadow_dither = 0.5

shadowmult

Syntax:

shadowmult = <scalar>

Range:

Not negative; effective range is 0.0 to 4.0

Default:

1

Purpose:

This parameter is obsolete effective this software release. Similar to blurmult for textures, shadowmult is a scaling factor for the size of the sample region for the depth map. The default size of the sample region is 4 x 4 pixels in the depth map.

Values lower than 0.5 (without using shadowoffset) are prone to aliasing and banding. The actual formula used to calculate the size of the sample area is:

numpixels = (4 * shadowmult) + shadowoffset

Care should be taken that numpixels does not become negative or 0. shadowmult is appropriate for the spotlight lighting model. It is ignored for point, infinite and ambient lights. It is ignored even for spotlights if shadow has not been set to TRUE. Note that depth maps are only used for RayCasting. shadowmult is meaningless and ignored when RayTracing.

Comments:

This component may be animated.

Example:

shadowmult = 3.0

shadowoffset

Syntax:

shadowoffset = <scalar>

Range:

unbounded; effective range is -2 to 8.

Default:

0

Purpose:

This parameter is obsolete effective this release. Similar to bluroffset for textures, shadowoffset modifies the sampling region of the depth map. shadowoffset adds a specified amount to the pixel area of the sampling region. The default sampling region is 4 by 4 pixels in the depth map. The actual formula used to calculate the sample region is:

numpixels = (4 * shadowmult) + shadowoffset

It is always square, numpixels to a side. Care should be taken that numpixels does not become negative or 0. shadowoffset is appropriate for the spotlight lighting model. It is ignored for point, infinite and ambient lights. It is ignored even for spotlights if shadow has not been set to TRUE. Note that depth maps are only used for RayCasting. shadowoffset is meaningless and ignored when RayTracing.

Comments:

This component may be animated.

Example:

shadowoffset = 0.5

shadow_blend_offset

Syntax:

shadow_blend_offset = <scalar>

Range:

0 to infinity

Default:

1.0

Purpose:

This is useful for removal of self shadowing.

Comments:

shadow_blend_offset offsets the depth of the blended shadow samples, but not the depth of the center sample. At zero, the sample region is a plane tangent to the light direction vector. As the value increases, the sample region becomes a cone with the outer edges towards the light. Its use is somewhat similar to the old bias_max; however, it cleans up self-shadows without sacrificing the tightness of a shadow relative to a very close object.

Raycast Shadows ONLY

Example:

shadow_blend_offset = .3

shadow_edge_quality

Syntax:

shadow_edge_quality = <scalar>

Range:

1 to infinity

Default:

2

Purpose:

Sets the blur filter size for shadow depth maps.

Comments:

At low values (1 or 2) slight staircasing can appear around shadow edges. Increasing the shadow_edge_quality will correct this problem, but increase rendering time a bit. Also the edge will become softer, requiring larger shadow_resolution values if hard edges are desired.

Noteshadow_resolution should be used to control general level of blur, not shadow_edge_quality.
NoteRaycast Shadows ONLY

Example:

shadow_edge_quality = 3

shadow_min_depth

Syntax:

shadow_min_depth = <scalar>

Range:

0.0 to infinity

Default:

0.05

Purpose:

To correct self shadowing problems in raycast shadows. The shadow_min_depth is the world space distance that a point is moved towards a spotlight before shadowing is calculated.

Comments:

If this value is 0, than an object will shadow itself by 50% (if it casts shadows) when the light is at an inclined angle to the surface. A relatively small shadow_min_depth value can bring the surface out of its own shadow, especially when combined with the shadow_blend_offset parameter. Also, if the surface does not need to cast shadows, only to receive them, turn shadow casting off on the object (then a shadow_min_depth of 0 is fine). The most typical example of this is a groundplane.

If shadow_min_depth is too high, shadows will not be cast from very close objects.

This parameter is similar to the old bias_min parameter, but much smaller correction values are now possible.

Raycast Shadows ONLY

Example:

shadow_min_depth = 0.03

shadow_output

Syntax:

shadow_output = <filename>

Range:

none

Default:

none

Purpose:

Specifies the file in which to store an 8-bit version of the depth map. This is useful if you want to create a bump map from the geometry, but is not required otherwise. shadow_output is appropriate for the spot lighting model. It is ignored for point, infinite and ambient lights. It is ignored even for spotlights if shadow has not been set to TRUE. Note that depth maps are only used for RayCasting. shadow_output is meaningless and ignored when RayTracing. For details on the differences between RayCasting with shadows and RayTracing, please refer to the User’s Guide.

Comments:

This component may be animated using the normal filename mechanisms.

Example:

shadow_output = “texture/new.bump” /* no frame extension */
 or
shadow_output = (“texture/new.bump”frame) /* with frame extension */

shadow_resolution

Syntax:

shadow_resolution = <scalar>

Range:

any value between 8 and 8192

Default:

512

Purpose:

Defines the size of shadow depth maps used in raycasting. Large shadow_resolution values provide sharper edged shadows but at a cost in memory and rendering time.

Comments:

Very soft and smooth shadows are possible with a shadow_resolution setting around 50. Low resolutions have the added advantage of being fast to render and taking up little memory.

The shadow_resolution is the primary factor determining the softness of shadows, but the spotlight spread and shadow_edge_quality also affect the general level of blur. The shadow map is defined relative to the cone of the spotlight; so a tightly focused spread will create sharper shadows. A spread of 90 will require a shadow_resolution 2 times that of a spread of 45 in order to match.

Raycast Shadows ONLY

Example:

shadow_resolution = 55

shadow_samples

Syntax:

shadow_samples = <scalar>

Range:

1 to infinity

Default:

2

Purpose:

Set the minimum number of shadow feeler rays per sample (used to create raytracer soft shadows).

Comments:

A large value will result in slower rendering times, but smoother quality soft shadows.

SEE soft_shadows

Raytracer ONLY.

Example:

shadow_samples = 8

shape

Syntax:

shape = BOX_VOLUME | SPHERE_VOLUME | CYLINDER_VOLUME | CONE_VOLUME | TORUS_VOLUME

Range:

One of the above.

Default:

SPHERE_VOLUME

Purpose:

This defines the shape of the volume light in space. The choices are:

The shapes of the volume light can be further modified by applying transformations to the dag node(s) above the volume light.

Comments:

Volume lights only.

Example:

shape = SPHERE_VOLUME

shine_along

Syntax:

shine_along = <triple>

Range:

Any set of coordinates in world space (but must be different than the light itself).

Default:

( 0.0, 0.0, 0.0 )

Purpose:

The triple gives the x, y and z coordinates describing the location of the center of illumination by the spotlight.

Comments:

This component may be animated using a motion path or by otherwise varying the value of the triple. shine_along is appropriate for the spot lighting model. It is ignored for point, directional and ambient lights.

Example:

shine_along = (20,5,-1)

size

Syntax:

size = <scalar>

Range:

Between 256 and 8192.

Default:

512

Purpose:

This parameter is obsolete effective this software release. size defines the resolution of depth maps used to cast shadows when RayCasting. Increasing the size will provide more detailed shadows, and will also increase the rendering time and the amount of memory used. A size of 512 uses 1 Mbyte of memory, a size of 1024 uses 4 Mbytes of memory.

Comments:

This component may be animated. size is appropriate for the spot lighting model. It is ignored for point, directional and ambient lights. It is ignored even for spotlights if shadow has not been set to TRUE. Note that depth maps are only used for RayCasting. The size component is meaningless and ignored when RayTracing.

Example:

size = 256

soft_shadows

Syntax:

soft_shadows = <scalar>

Range:

0 (FALSE) or not 0 (TRUE)

Default:

FALSE

Purpose:

If TRUE, then soft shadowing is enabled in Alias RayTracing.

Comments:

The nature of soft shadows created is determined by the distance of the light from the object casting shadows, combined with the light_radius parameter. Shadows are generated to match a globe-shaped light with the specified radius (in world space units). If the light source is small and/or far away, then hard-edged shadows will result. Shadows become softer-edged as the light’s radius increases, as happens in the real world. However, because of super-sampling, the region of partial shadow (penumbra) can become noisy. To correct this, turn up the number of samples used, adjusting either the shadow_samples level (on the light) or the global aalevelmin and aalevelmax. Note that if fast_shading is turned on, the number of shadow samples per pixel will equal the shadow_samples level, and will not be affected by the aalevel. Also, due to a blending function used, soft_shadows can be useful even when the light_radius = 0 and the shadow_samples = 1. This method helps avoid jaggies on shadow boundaries when fast_shading is used.

soft_shadows works for Alias RayTracing only.

Example:

soft_shadows = TRUE

specular

Syntax:

specular = <boolean>

Range:

ON/OFF

Default:

ON

Purpose:

If set to ON, then the light will contribute to the specular component. It is useful to turn this OFF when using a negative volume light to remove light.

Comments:

Volume lights only.

Example:

specular = ON

split_velocity_min

Syntax:

split_velocity_min = <scalar>

Range:

0 to infinity

Default:

5

Purpose:

Appears only if psys_collisions are set to ON. This provides a limit on the speed a particle must be moving when it collides with an object to determine if the particle splits.

Example:

split_velocity_min = 5

spread

Syntax:

spread = <scalar>

Range:

2 to 179. The absolute value is used. This value is clipped to 179 if the magnitude is too large. Similarly, if the magnitude is less than 0.2, it is set to 0.2 to avoid numeric instabilities.

Default:

40.0 (degrees)

Purpose:

spread provides the angle of illumination from a spotlight in degrees.

Comments:

This component may be animated. The smaller the value, the tighter the spotlight will appear to be. If a negative value is specified, the sign is ignored. spread is appropriate for the spot lighting model. It is ignored for point, directional and ambient lights.

Example:

spread = 15

star_points

Syntax:

star_points = <scalar>

Range:

0 to infinity

Default:

4.0

Purpose:

To set the number of points on star filters. (see glow_star_level.)

Comments:

Values of 1 and 2 are frequency useful. For example if star_points = 1.0 and glow_star_level = 1.0 and the glow_type = RAINBOW, then a familiar rainbow arch will be generated.

Example:

star_points = 5.0

torus_radius

Syntax:

torus_radius = <scalar>

Range:

-infinity to infinity

Default:

0.0

Purpose:

This is the ratio of the minor radius to the major radius. The default value of 0.5 gives a typical bagel, where the “hole” has been squashed down to a single point.

Comments:

This value is only applicable to a TORUS volume light.

Example:

torus_radius = 0.5

turbulence_animated

Syntax:

turbulence_animated = <boolean>

Range:

ON/OFF

Default:

ON

Purpose:

The turbulence may be static, or it may vary over time. With static turbulence, you get dappled lighting but it doesn’t change. With animated turbulence, you get flickering light. In a static turbulent wind field, the eddies are always in the same place: a stream of particles blowing through a static field would always follow the same path. In an animated field, the path itself would swirl and change.

Comments:

Volume lights only.

Example:

turbulence_animated = ON

turbulence_granularity

Syntax:

turbulence_granularity = <scalar>

Range:

0 to 1.0

Default:

0.0

Purpose:

This value defines the Low frequency cutoff. It is like a high pass filter. It allows for grainy patterns of turbulence.

Comments:

Volume lights only.

Example:

turbulence_granularity = 0.0

turbulence_intensity

Syntax:

turbulence_intensity = <scalar>

Range:

0.0 to 1.0

Default:

0.0

Purpose:

This defines the degree to which a volume light is turbulent.

Comments:

The light or force direction is modified by the turbulence, such that when the turbulence_intensity = 1.0 then the direction is totally the direction calculated by the turbulence. When the turbulence_intensity = 0.5, then the direction will be a 50/50 blend of turbulence and light. In the case of the default SPHERE volume shape, a value of 0.5 would cause objects to move generally away from the light, but in a turbulent fashion. If the turbulence_intensity = 1, then objects would just swirl around in no particular direction. The decay of the light is respected, however, so the objects would swirl more vigorously near the light source. If you wish to increase the general level of force you must use the light intensity or force_intensity parameter. Note that this differs from the turbulence_intensity in the Environment dynamics section, as that value controls the overall intensity of force.

For volume lights only.

Example:

turbulence_intensity = 0.0

turbulence_persistence

Syntax:

turbulence_persistence = <scalar>

Range:

0 to infinity

Default:

5.0

Purpose:

This value represents the time scale.

Comments:

Stretch out the turbulence so that it changes more slowly. For volume lights only.

Example:

turbulence_persistence = 5.0

turbulence_roughness

Syntax:

turbulence_roughness = <scalar>

Range:

0 to 1.0

Default:

0.5

Purpose:

This value defines the High Frequency cutoff for the spatial portion of the Fourier spectrum. It is like a low-pass filter.

Comments:

For volume lights only.

Example:

turbulence_roughness = 0.5

turbulence_space_resolution

Syntax:

turbulence_space_resolution = <scalar>

Range:

1 to 16

Default:

16

Purpose:

This defines how large the turbulence table is in X, Y, Z.

Comments:

Turbulence patterns match at the edges of the turbulence box, so that this pattern is repeated seamlessly throughout the range of the volume light.

Example:

turbulence_space_resolution = 16

turbulence_spread

Syntax:

turbulence_spread = <scalar>

Range:

-infinity to infinity

Default:

0.5

Purpose:

This value represents the space scale.

Comments:

Scale the turbulence box so that the same amount of turbulence covers a larger volume. Volume lights only.

Example:

turbulence_spread = 0.5

turbulence_time_resolution

Syntax:

turbulence_time_resolution

Range:

2 to 32

Default:

16

Purpose:

For animated turbulence, this defines the resolution in time. (that is, this many 3-D tables are created).

Comments:

Volume lights only.

Example:

turbulence_time_resolution = 16

turbulence_variability

Syntax:

turbulence_variability

Range:

0 to 1.0

Default:

0.5

Purpose:

This value defines the High Frequency cutoff for the time portion of the Fourier spectrum.

Comments:

Volume lights only.

Example:

turbulence_variability

up

Noteup is reserved for future use. In this software release, it is commented out when the SDL file is written from the Alias package.

use_old_shadow_map_algorithm

Syntax:

use_old_shadow_map_algorithm = <scalar>

Range:

0 (FALSE) or non-0(TRUE)

Default:

FALSE

Purpose:

An improved shadow map algorithm was introduced in version 7 to improve the resulting image quality. This should be able to replace the old technique. However, there can be very isolated situations where the old technique is desirable - in this case, turn this option ON

Example:

use_old_shadow_map_algorithm = FALSE;

use_shadow_map

Syntax:

use_shadow_map = <scalar>

Range:

0 (FALSE) or non-0(TRUE)

Default:

FALSE

Purpose:

This is relevant to the raytracer/powertracer only. It is now possible to do shadow casting while in the raytracer (if this option is turned ON). This has several advantages:

Comments:

For raytracer/powertracer only.

Example:

use_shadow_map = FALSE;

Particle system keywords

The following components are shared by both Light and Shader data types, with the exception of psys_bend_u and psys_bend_v, which are used only in Shaders.

psys_bend_u

Syntax:

psys_bend_u = <scalar>

Range:

-infinity to infinity

Default:

0.0

Purpose:

To bend the emission of particles along the U direction.

Comment:

Particles are usually emitted along the normal to the surface. U bend specifies how much the emission can bend in the U direction. A value of -1 means no bend, a value of 1 means the particles are emitted tangent to the surface in the U direction.

Example:

psys_bend_u = 0.0

psys_bend_v

Syntax:

psys_bend_v = <scalar>

Range:

-infinity to infinity

Default:

0.0

Purpose:

To bend the emission of particles along the V direction.

Comment:

Particles are usually emitted along the normal to the surface. V bend specifies how much the emission can bend in the V direction. A value of -1 means no bend, a value of 1 means the particles are emitted tangent to the surface in the V direction.

Example:

psys_bend_v = 0.0

psys_blob_lighting

Syntax:

psys_blob_lighting = CONSTANT_LIGHTING | ILLUMINATED | SELF_SHADOWING

Range:

Default:

CONSTANT_LIGHTING

Purpose:

A blob can have 3 kinds of lighting: CONSTANT, ILLUMINATED, or SELF SHADOWING.

CONSTANT that there is no contribution from any lights; only the blob color is used.
ILLUMINATED the lighting is calculated once per blob, and the entire blob is illuminated to that extent. If the blobs are discrete, sudden changes in illumination may be noticeable.
SELF SHADOWING the lighting ends up being on a per-pixel basis, and is correspondingly slower than the other methods.

Example:

psys_blob_lighting = CONSTANT_LIGHTING

psys_blob_map

Syntax:

psys_blob_map = Texture(rgb)

Range:

Texture(color)

Default:

(0,0,0)

Purpose:

If the Render Type is BLOBBY_SURFACE, the color can be texture mapped. A surface texture will be mapped projecting from the eye point, so that it will appear to follow the blob. A solid texture will be applied according to the solid texture placement, so that the blobs will appear to move through the texture.

Example:

psys_blob_map = (0,0,0)

psys_blob_noise

Syntax:

psys_blob_noise = <scalar>

Range:

0 to infinity

Default:

0.0

Purpose:

A value greater than 0 makes the blobs look less regular. This helps hide the fact that the underlying system may have a small number of large blobs.

Example:

psys_blob_noise = 0.0

psys_blob_noise_frequency

Syntax:

psys_blob_noise_frequency = <scalar>

Range:

-infinity to infinity

Default:

0.1

Purpose:

The noise frequency should be chosen according to the size of the particles.

Example:

psys_blob_noise_frequency = 0.1

psys_blob_threshold

Syntax:

psys_blob_threshold = <scalar>

Range:

0 to infinity

Default:

0.2

Purpose:

This value is the density at which we threshold the surface for Surf Shading or BLOBBY_SURFACE rendering.

Example:

psys_blob_threshold = 0.2

psys_blur_quality

Syntax:

psys_blur_quality = <scalar>

Range:

0 to infinity

Default:

0.5

Purpose:

Blobs are generated along the path of the particle to get motion blur. If the blur quality is high, the particles are small, and they travel a long way in one frame, then a lot of blobs will be created for each frame. In which case, rendering will be slow and a lot of memory will be used up.

Example:

psys_blur_quality = 0.5

psys_branch_angle

Syntax:

psys_branch_angle = <scalar>

Range:

-infinity to infinity

Default:

45

Purpose:

After splitting, child particles will move at this angle from the particles original path (for collisions, this is the path AFTER the collision).

Comments:

Caution: large branch angles may result in the particles penetrating the object that they were supposed to be colliding with.

Example:

psys_branch_angle = 45

psys_buoyancy

Syntax:

psys_buoyancy = <scalar>

Range:

-infinity to infinity

Default:

0.0

Purpose:

This value gives the particle additional velocity in the direction of gravity (a positive is high, and a negative value is low).

Comment:

This parameter is only applicable to GAS particles.

Example:

psys_buoyancy = 0.0

psys_collisions

Syntax:

psys_collisions = <boolean>

Range:

Boolean (ON/OFF)

Default:

OFF

Purpose:

If this value is OFF, particles will not collide with any objects. If set to ON, particles will collide with any collision walls that have been turned ON (see Floor, ceiling, left, right, front, back, in the ENVIRONMENT Section for more information), and any simulation objects that have particle collisions set to ON.

Example:

psys_collisions = OFF

psys_color

Syntax:

psys_color = <triple>

Range:

Texturable rgb

Default:

(255,255,255)

Purpose:

The color of a particle can be set to a fixed value, or texture mapped over its lifetime. If it is mapped, then the V values of the map are mapped onto the particles' lifetime (a V-ramp is a good choice for a texture here).

Example:

psys_color = (255,255,255)

psys_curl

Syntax:

psys_curl = <scalar>

Range:

0 to infinity

Default:

0.0

Comments:

As the twist approaches 1, the hair or trajectory will become more tightly coiled, until at a value of 1 it will go around in a loop. To create more curls in hair, the psys_hair_segments value must be increased.

Purpose:

This is the amount particles twist about their direction of motion. This is especially useful with hair.

Example:

psys_curl = 0.0

psys_density

Syntax:

psys_density = <scalar>

Range:

-infinity to infinity

Default:

1.0

Purpose:

This is the visual density of the particles. Less dense particles will appear more transparent, more dense ones will be more opaque. If density is 1, the transparency of the object is used, if density is 0, the particles are completely transparent). Self shadowing will be more visible in denser particles.

Example:

psys_density = 1.0

psys_elasticity

Syntax:

psys_elasticity = <scalar>

Range:

-infinity to infinity

Default:

0.5

Purpose:

The elasticity of an object determines the amount of damping of speed on collision with another object. A value of 0 means all speed is lost, a value of 1 means the object bounces back with the same speed.

Example:

psys_elasticity = 0.5

psys_emission

Syntax:

psys_emission = <boolean>

Range:

Boolean (ON/OFF)

Default:

OFF

Purpose:

If Emit Particles is set to ON, particle parameters will be used.

Example:

psys_emission = OFF

psys_end_frame

Syntax:

psys_end_frame = <scalar>

Range

-infinity to infinity

Default:

10000

Purpose:

To indicate the last frame of animation for particle emission.

Example:

psys_end_frame = 10000

psys_filename

Syntax:

psys_filename = <filename>

Purpose:

This is the full path prefix for the particle file name. This field is set on the shader when a simulation is run with Save Particles ON (see Anim Tools > Run dynamics). The particles are saved in particle description files, one per shader or light particle emitter, per frame.

Comments:

For example, if the particle emitting shader is called Shader#1, and you type "test" when prompted for a Save Particles file location, then the particle files will be stored in./user_data/<project>/sdl/test.psys/Shader#1.n, where n is the frame number for that particle file. Alternately, you can type your own path names for the directory where particle files are stored.

Example:

psys_filename = Shader#1

psys_friction

Syntax:

psys_friction = <scalar>

Range

0 to infinity

Default:

0.5

Purpose:

The coefficient of friction defines how much an object gets slowed down when in contact with another object.

Example:

psys_friction = 0.5

psys_glow_intensity

Syntax:

psys_glow_intensity = <scalar>

Range:

0 to infinity

Default:

0

Purpose:

Particles can emit glow. See the section glow_intensity and following for information on glow parameters.

Example:

psys_glow_intensity = 0

psys_hair_length_max

Syntax:

psys_hair_length_max = <scalar>

Range:

0 to infinity

Default:

2.0

Purpose:

Used to determine the distance a particle can travel in a frame. Hair length is randomized between the psys_hair_length_max and psys_hair_length_min values. These values, combined with the psys_hair_segments value, determine the psys_lifespan_min and psys_lifespan_max for the particles generated in the Generation window.

Example:

psys_hair_length_max = 2.0

psys_hair_length_min

Syntax:

psys_hair_length_min = <scalar>

Range:

0 to infinity

Default:

1.0

Purpose:

Used to determine the distance a particle can travel in a frame. Hair length is randomized between the psys_hair_length_max and psys_hair_length_min values. These values, combined with the psys_hair_segments value, determine the psys_lifespan_min and psys_lifespan_max for the particles generated in the Generation window.

Example:

psys_hair_length_min = 1.0

psys_hair_stiffness

Syntax:

psys_hair_stiffness = <scalar>

Range:

0 to infinity

Default:

0.1

Purpose:

As the stiffness of a hair approaches 1 it responds less and less to forces. Note, however, that time lag effects are not affected by this parameter. To totally remove the time lag effect, make the steps/frame for the simulation greater than the value for psys_hair_stiffness (and increase the psys_particles_per_sec).

Example:

psys_hair_stiffness = 0.1

psys_hair_segments

Syntax:

psys_hair_segments = <scalar>

Range:

1 to infinity

Default:

10.0

Purpose:

This value is used to determine the number of line segments along the longest strands of hair. If the emitter is in motion, the oldest particles will lag behind where the lag time (in frames) equals the value set in Hair Segments and the Start and End Frame values set in the Particle Emission window. This lag can create a nice effect (like hair in water), but if it is too large, either reduce the Hair Segments value, or increase the simulation's Start and End Frame values.

Comments:

Increasing the Start and End Frame values will require that you increase the number of Particles/Second in the Generation window in order to generate the same number of hairs.

Example:

psys_hair_segments = 10.0

psys_hit_method

Syntax:

psys_hit_method = BOUNCE | DIE | SPLIT

Range:

As above

Default:

BOUNCE

Purpose:

If particles have collision turned on, they can do one of three things when they collide with an object.

BOUNCE means the particles will bounce off the surface of the object, subject to the elasticity of the particles and the surface.
DIE means the particles will disappear the frame after they collide.
SPLIT means the particles will split into several new particles, each of which inherit the parent's age and lifetime. Particles must be moving fast enough (> Split Vel. Min) in order to split, otherwise they will just bounce.

Example:

psys_hit_method = BOUNCE

psys_incandescence

Syntax:

psys_incandescence = texture(triple)

Range:

Texturable rgb

Default:

(0,0,0)

Purpose:

The Incandescence of a particle can be set to a fixed value, or texture mapped over its lifetime. If it is mapped, then the V values of the map are mapped onto the particles' lifetime (a V-ramp is a good choice for a texture here).

Example:

psys_incandescence = (0,0,0)

psys_lifespan_min

Syntax:

psys_lifespan_min = <scalar>

Range:

0 to infinity

Default:

10

Purpose:

This value defines the minimum lifespan of a particle in frames.

Example:

psys_lifespan_min = 10

psys_lifespan_max

Syntax:

psys_lifespan_max = <scalar>

Range:

0 to infinity

Default:

50

Purpose:

This value defines the maximum lifespan of a particle in frames. If min and max are different, then particle lifetimes are uniformly distributed in the range between them.

Example:

psys_lifespan_max = 50

psys_mass

Syntax:

psys_mass = <scalar>

Range:

0 to infinity

Default:

0.1

Purpose:

This value is the mass of an individual particle (in kilograms). It determines how forces affect the particles. The lighter the particle, the more a force will accelerate it.

Example:

psys_mass = 0.1

psys_motion_type

Syntax:

psys_motion_type = GAS | SOLID | HAIR

Range:

GAS

SOLID

HAIR

Default:

GAS

Purpose:

Select HAIR, SOLID or GAS particles. Gaseous particles follow the motion of the air; they are only affected by Turbulence and Wind fields. Solid particles have mass, and are affected by regular forces.

Example:

psys_motion_type = GAS

psys_num_children

Syntax:

psys_num_children = <scalar>

Range:

0 to infinity

Default:

2

Purpose:

This is the number of children that a splitting particle will generate.

Example:

psys_num_children = 2

psys_parent_shading

Syntax:

psys_parent_shading = <boolean>

Range:

Boolean (ON/OFF)

Default:

OFF

Purpose:

If this is ON, the particle gets the color of the point on the surface that it emanated from. For a blob surface, the blobs inherit the parent's color texture map.

Example:

psys_parent_shading = ON

psys_particles_per_sec

Syntax:

psys_particles_per_sec = <scalar>

Range:

0 to infinity, Texturable

Default:

300

Purpose:

This value defines how many particles are emitted from the object per second. This is done in seconds so that the net effect is independent of frame rate.

Comments:

If particle emission is texture mapped, then the actual rate may be lower.

Example:

psys_particles_per_sec = 300

psys_randomization

Syntax:

psys_randomization = <scalar>

Range:

0 to infinity

Default:

0

Purpose:

Randomizes the branch angle by rotating it around the direction of particle travel.

Example:

psys_randomization = 0

psys_render_type

Syntax:

psys_render_type = THIN_GAS | CLOUD | BLOBBY_SURFACE

Range:

THIN_GAS

CLOUD

BLOBBY_SURFACE

Default:

THIN_GAS

Purpose:

A particle can be rendered as THIN GAS, CLOUD or BLOBBY SURFACE.

THIN_GAS best suited for fairly transparent particle systems. This method is fast, as it uses the average density of the particles along a ray to calculate the particle systems contribution to a pixel.
CLOUD for denser particle systems, is more accurate (but slower), and in fact must be used if psys_blob_lighting is set to SELF_SHADOWING. This method calculates the contribution of the blobs in sorted order front to back, so that the structure of the individual blobs is more visible.
BLOBBY_SURFACE renders the implicit surface created by the blobs.

Example:

psys_render_type = THIN_GAS

psys_size

Syntax:

psys_size = <scalar>

Range:

0 to infinity, Texturable

Default:

0.5

Purpose:

The (world space) size of a particle may be set to a fixed value, or texture mapped over its lifetime. If it is mapped, then the V values of the map are mapped onto the particles' lifetime (a V-ramp is a good choice for a texture here). As the size of individual blobs gets larger and overlap increases, rendering time will increase.

Comments:

This size is also used for buoyancy calculations for solid particles, so that a particle that ends up much less dense than the medium may end up rising very rapidly.

Example:

psys_size = 0.5

psys_speed

Syntax:

psys_speed = <scalar>

Range:

-infinity to infinity, Texturable

Default:

5.0

Purpose:

This value defines the average speed of particles being emitted.

Example:

psys_speed = 5.0

psys_speed_decay

Syntax:

psys_speed_decay = <scalar>

Range:

-infinity to infinity

Default:

0.8

Purpose:

This value is a multiplier which determines how fast a particle loses its initial velocity. A value of 0 means the initial velocity is lost immediately, a value of 1 means its initial velocity is retained indefinitely. This value is only applicable to GAS particles.

Example:

psys_speed_decay = 0.8

psys_speed_range

Syntax:

psys_speed_range = <scalar>

Range:

-infinity to infinity

Default:

0.1

Purpose:

This value defines how much the emission speed of the particles can vary. The speed at which a particle is emitted varies in the range (speed - speed range, speed + speed range). If Speed Range is 0, all particles are emitted at the average speed.

Example:

psys_speed_range = 0.1

psys_split_time

Syntax:

psys_split_time = <scalar>

Range:

0 - 1

Default:

0

Purpose:

Particles may split spontaneously (once per particle) as well as on collision. The Split Time is the fraction of their lifetime at which they will split. A value of 0 (particle birth) or 1 (particle death) will not cause any splitting.

Example:

psys_split_time = 0.01

psys_start_frame

Syntax:

psys_start_frame = <scalar>

Range:

-infinity to infinity

Default:

1

Purpose:

Particles are emitted starting at this frame. The start frame can be set earlier than the animation start frame in order to "run up" the particle system. Running up the particle system allows the first frame to show a particle effect in mid motion rather than just starting.

Example:

psys_start_frame = 1

psys_surface_shading

Syntax:

psys_surface_shading = <scalar>

Range:

0 to 1.0

Default:

0.0

Purpose:

This parameter controls the level of shading on the surface of the particle system. It behaves somewhat differently depending on the Motion Type and Render Type selected. If the Render Type is BLOBBY_SURFACE or the Motion Type is HAIR, it controls specular illumination. As the value approaches 1.0 the highlight becomes more intense and focused.

Comments:

For the best results when rendering hair, the Render Type should be CLOUD.

If the Render Type is THIN_GAS or CLOUD and the motion type is anything but HAIR, the Surf Shading controls the amount of diffuse illumination at the surface of the particle mass. The surface of the cloud for this shading is controlled using the psys_blob_threshold parameter. As the value approaches 1.0, the shading of a cloud becomes completely surface shaded, with no volume illumination of the particles.

If this is non-zero, it uses the psys_blob_threshold to create a "virtual surface" which will provide normals to be used in the shading calculation. Increasing the surface shading will give the blobs sharper edges, (for example, clouds have a large surface shading component). A value of 1 means diffuse surface illumination, a value of 0 means blob illumination.

NoteBecause normals are provided, the rendering is slower when the Surf Shading value is non-zero.

Example:

psys_surface_shading = 0.5

psys_time_random

Syntax:

psys_time_random = <boolean>

Range:

Boolean (ON/OFF)

Default:

ON

Purpose:

If time random is OFF, particles will be emitted from the same spot on the surface every frame. If set to ON, particles will be emitted from different spots every frame.

Example:

psys_time_random = ON

psys_translucence

Syntax:

psys_translucence = <scalar>

Range:

0 to 1

Default:

0.6

Purpose:

Translucence is the extent to which diffuse light can penetrate the object. The translucence of a particle can be set to a fixed value, or texture mapped over its lifetime. If it is mapped, then the V values of the map are mapped onto the particles' lifetime (a V-ramp is a good choice for a texture here).

Example:

psys_translucence = 0.6

psys_transparency

Syntax:

psys_transparency = <triple>

Range:

Texturable rgb

Default:

(0,0,0)

Purpose:

The transparency of a particle can be set to a fixed value, or texture mapped over its lifetime. If it is mapped, then the V values of the map are mapped onto the particles' lifetime (a V-ramp is a good choice for a texture here).

Comment:

Remember that the net transparency of the object will also depend on its size. Smaller and/or less dense particles will appear more transparent anyway.

Example:

psys_transparency = (0,0,0)

psys_use_particle_file

Syntax:

psys_use_particle_file = <boolean>

Range:

Boolean (ON/OFF)

Default:

OFF

Purpose:

If set to ON, particles will not be generated during the simulation, but will be read from files instead. These files would have been generated by previous simulations or come from external sources.

Comments:

See the File Formats section of the Reference Guide for information on Particle File Formats.

Example:

psys_use_particle_file = OFF